Difference between revisions of "How to Install and Configure Altium"
(added instructions on installing SSI libraries) |
|||
| (35 intermediate revisions by 5 users not shown) | |||
| Line 1: | Line 1: | ||
| + | {{guide| authors=({{slack-user|sunet-id=smaldonado|display-name=Sasha Maldonado}}) and updated by ({{slack-user|sunet-id=timv|display-name=Tim Vrakas}})}} | ||
| − | = | + | ==Background== |
| − | |||
| − | + | Altium Designer is SSI's preferred circuit board design program. The program runs exclusively on Windows; Mac and Linux users have successfully run Altium through both dedicated Windows partitions and Windows virtual machines. Though debated amongst SSI members, a USB mouse is also a useful tool when designing circuit boards. | |
| − | |||
| − | |||
| − | |||
| − | |||
| − | |||
| − | + | [https://altium.com Altium Ltd.] sponsors SSI with a number of shared licenses to use their software. These licenses are managed over the internet - after signing in for the first time, your computer will automatically download a license file every time you open Altium and release your license when you close the program. | |
| − | + | ||
| + | Altium allows users to draw circuit schematics and then design the physical layout of the components represented in the schematic. This requires libraries of symbols to represent components, the physical dimensions of those components in real life, and links so that they can be purchased from suppliers. SSI and Stanford Solar Car Project members have designed parts for these libraries over the course of several years, and as an Altium user, you will almost certainly [[Making Parts for PCB Libraries|add parts to the SSI PCB libraries]]. | ||
| + | |||
| + | ==Where do things live?== | ||
| + | There are three places Altium data lives: | ||
| + | |||
| + | * All new projects are stored on Github. An example of this is [https://github.com/stanford-ssi/ThunderGuppy-EE ThunderGuppy-EE]. All SSI projects should be public on the [https://github.com/stanford-ssi SSI Github], but in order to commit changes, you're going to need to [https://github.com/join create a Github Account] and have someone add you as a member of the SSI Github organization. Ask in {{slack-channel|git}} to be added. | ||
| + | * All components and parts live on the [https://stanford-university-student-space-initiative.365.altium.com/ Altium 365 workspace]. To access this you will need an Altium account connected to your Stanford email, and you will need to be added to the workspace. You should ask for these things in {{slack-channel|altium}}, and tag the {{slack-user|sunet-id=altium-admin|display-name=altium-admin}}. | ||
| + | * Templates, Logos, Fonts, and oddball SSI-wide data lives in the [https://ssi-svn.stanford.edu/svn/altium-core/ Altium SVN]. SVN ([https://subversion.apache.org/ Subversion]) is the grandfather to Git and Google Drive. To access the SVN you need credentials which you can get from https://ssi-svn.stanford.edu/ and an SVN client, like [https://tortoisesvn.net/ TortoiseSVN]. | ||
| + | |||
| + | ==A Brief Motivational Note== | ||
| + | At the time of this guide's original writing, only two people in SSI had used Altium for more than a year (neither of whom wrote this article - I began using Altium 8 months prior to originally writing it). As with any worthwhile skill, Altium takes time to gain familiarity with, and doing projects in Altium - though initially somewhat tedious and frustrating at times - is the best way of learning to use it. | ||
| + | |||
| + | Furthermore, as with all good technical software, Altium has many features, with many buttons and options. This is understandably anxiety-inducing. This guide (and the SSI wiki at large) is written to try and point you to the buttons you will need to complete setup and common tasks, which are a small subset of all of the buttons available to you. People who have worked in Altium for 20 years have commented that they still have never used most of the features of the program. In reality, doing a couple of projects is enough for you to learn what the core functions are and how to use them, and SSI has a robust community of able and willing engineers eager to help you get started. | ||
| + | |||
| + | With that in mind, let's get underway! | ||
| + | |||
| + | ==Installation and Setup== | ||
| + | |||
| + | ===Account Setup=== | ||
| + | [[File:TortoiseSVNMenu.png|thumb|200px|right|A screenshot showing all of the SVN functions available when right-clicking after installing TortoiseSVN. You will never use most of these.]] | ||
| + | Within the {{slack-channel|altium}} channel, request an account for Altium itself, and the Altium 365 workspace. Messaging {{slack-user|sunet-id=altium-admin|display-name=altium-admin}} will summon the relevant person. Once they give you an account, you should receive an email allowing you to log in to your account and access the [https://stanford-university-student-space-initiative.365.altium.com/ Altium 365 Workspace]. From the online workspace you can browse some recent projects without having to install any software. | ||
| + | |||
| + | === But I don't have a Windows computer! === | ||
| + | Never fear, many cool projects were designed without Windows computers! You have a few options: | ||
| + | |||
| + | * Install Windows in a dual-boot configuration with your current OS (only for x86 computers, you'll need a bit of storage) | ||
| + | * Run Windows in a local Virtual Machine (VM). [https://www.virtualbox.org/ VirtualBox] works well on many systems, and Stanford offers [https://stanford.onthehub.com/WebStore/Welcome.aspx VMWare for free], but for Apple Silicon (ARM) machines, [https://kb.parallels.com/124137 only Parallels supports DirectX], without which things will be very slow. | ||
| + | * Connect to an [[Windows Remote VMs|SSI hosted Virtual Machine (VM)]]. This works best when you're connected directly to a campus network. | ||
| + | * Use an SSI desktop, in [[End station III|ESIII]]. This works well, but can be inconvenient. | ||
| + | |||
| + | ===Installing Altium=== | ||
| + | |||
| + | Once you have an Altium account, Altium Designer can be downloaded [http://www.altium.com/products/downloads here] after logging in on the Altium website. Be aware that the software will only install on Windows operating systems. After downloading, install with the default settings. | ||
| + | |||
| + | ===Connecting Altium to the License System=== | ||
| + | [[File:AltiumLicense.png|thumb|200px|right|Protip: Don't publish sensitive information on the internet.]] | ||
| + | After Altium finishes installing, open it. Under "My Account," click "Sign in" and log in with your Altium account. Check "Sign me in when I open Altium Designer," as this will automatically grant you license access when you start the program. Next, under "Available Licenses," select Altium Designer from the list of products (you may or may not have other options listed; you can safely ignore all other ones) and click "Use" underneath (see right). This will now happen automatically every time you open the program. | ||
| + | |||
| + | ===Configuring Altium Preferences=== | ||
| + | [[File:SystemDefaultLocations.png|thumb|200px|right|You will end up with something like this.]] | ||
| + | Altium's default preferences are quite workable, but a couple of settings relating to the default locations of files need to be configured on each new computer. To change Altium preferences, from the top bar, click "DXP → Preferences..." | ||
| + | |||
| + | ====Templates Location==== | ||
| + | [[File:DataManagementTemplates.png|thumb|200px|right|You will end up with something like this, unless you're attempting to steal my identity, in which case you will end up with ''exactly'' this.]] | ||
| + | <s>An unjustifiable length of time was spent creating formatting templates for SSI circuit schematics, which make for a clean, professional project and add a bit of information to each schematic. To use, in Preferences, go to "Data Management → Templates," and set the "Template location" field to point to the "libraries\templates" folder in your Altium SVN. See the image at right for an example of the result.</s> '''TODO: Update the templates and these instructions.''' | ||
| + | |||
| + | ===Install the SSI PCB Logos Font=== | ||
| + | Adding logos to PCBs is an important aspect of professionalism, part of SSI's agreements with its sponsors, and a nice way to add some creativity to a technical process. For logos that SSI commonly uses, we've created a font with scalable versions of each. Download the font from [https://ssi-svn.stanford.edu/svn/altium-core/libraries/logos/SSI/SSI_Logos.ttf the SVN], and install it to your computer. | ||
| + | |||
| + | ===Remap Delete Key=== | ||
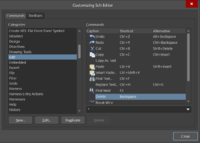
| + | [[File:DeleteKeyRemapping18.png|thumb|200px|right|You should end up with this.]] | ||
| + | ''This step is only required of computers which do not have distinct "backspace" and "delete" keys. Desktops and most non-Apple laptops can skip this step. '''Apple laptops which have a "delete" key that functions as a backspace key may need to complete this step.''''' | ||
| + | |||
| + | If you do not have a schematic open already, open one by clicking "File → New → Schematic." Next, open up the Customize panel by either clicking on a blank space of the toolbar (the space to the right of the "Help" drop-down menu works) or by right-clicking in that same spot and selecting "Customize..." In the window that comes up (see right), click "Edit" from the "Categories" column on the left, then double click on "Delete" in the "Commands" column on the right. This is the command used to delete components from a schematic, which is by default mapped to the delete key, which, if you're completing this step, you do not have. Click the "Primary" field, and then hit your backspace key to remap the command to that key. This only changes the delete key for schematics, so repeat this process with a PCB document open. | ||
| + | |||
| + | '''You're done!''' Welcome to Altium! | ||
| + | |||
| + | ==Next Steps== | ||
| + | |||
| + | ;A First Project :[[Your First Altium Project|This (currently in-development) guide]] offers you a walkthrough of a fun introductory Altium project, which ends with making a circuit board that allows you to play StrEEt Fighter with your fellow SSI members. | ||
| + | ;Creating Parts for Altium Libraries : [[Making Parts for PCB Libraries|This guide]] walks you through the process of adding new parts to the SSI Altium library, teaching both the process involved and quality standards for the library that we and the Stanford Solar Car Project have long worked to maintain. | ||
| + | |||
| + | ==Addendum: SVN== | ||
| + | If you need a single file from the SSI SVN, you can download it from the [https://ssi-svn.stanford.edu/ web interface]. If you want to download many files, or make changes, you will need to [[SVN|check out the SVN repo]]. | ||
| + | |||
| + | [[Category: Altium]] | ||
Latest revision as of 06:30, 23 August 2022
|
This is a guide Welcome! This article is intended to guide you through an SSI process. While its authors have made efforts to make it useful, if you have questions, please ask the authors on Slack. They will be able to both help you and improve this resource for future SSI-ers. This article was written by ( |
|---|
Background
Altium Designer is SSI's preferred circuit board design program. The program runs exclusively on Windows; Mac and Linux users have successfully run Altium through both dedicated Windows partitions and Windows virtual machines. Though debated amongst SSI members, a USB mouse is also a useful tool when designing circuit boards.
Altium Ltd. sponsors SSI with a number of shared licenses to use their software. These licenses are managed over the internet - after signing in for the first time, your computer will automatically download a license file every time you open Altium and release your license when you close the program.
Altium allows users to draw circuit schematics and then design the physical layout of the components represented in the schematic. This requires libraries of symbols to represent components, the physical dimensions of those components in real life, and links so that they can be purchased from suppliers. SSI and Stanford Solar Car Project members have designed parts for these libraries over the course of several years, and as an Altium user, you will almost certainly add parts to the SSI PCB libraries.
Where do things live?
There are three places Altium data lives:
- All new projects are stored on Github. An example of this is ThunderGuppy-EE. All SSI projects should be public on the SSI Github, but in order to commit changes, you're going to need to create a Github Account and have someone add you as a member of the SSI Github organization. Ask in
 #git
#git - All components and parts live on the Altium 365 workspace. To access this you will need an Altium account connected to your Stanford email, and you will need to be added to the workspace. You should ask for these things in
 #altium
  @altium-admin
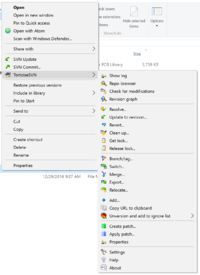
 - Templates, Logos, Fonts, and oddball SSI-wide data lives in the Altium SVN. SVN (Subversion) is the grandfather to Git and Google Drive. To access the SVN you need credentials which you can get from https://ssi-svn.stanford.edu/ and an SVN client, like TortoiseSVN.
A Brief Motivational Note
At the time of this guide's original writing, only two people in SSI had used Altium for more than a year (neither of whom wrote this article - I began using Altium 8 months prior to originally writing it). As with any worthwhile skill, Altium takes time to gain familiarity with, and doing projects in Altium - though initially somewhat tedious and frustrating at times - is the best way of learning to use it.
Furthermore, as with all good technical software, Altium has many features, with many buttons and options. This is understandably anxiety-inducing. This guide (and the SSI wiki at large) is written to try and point you to the buttons you will need to complete setup and common tasks, which are a small subset of all of the buttons available to you. People who have worked in Altium for 20 years have commented that they still have never used most of the features of the program. In reality, doing a couple of projects is enough for you to learn what the core functions are and how to use them, and SSI has a robust community of able and willing engineers eager to help you get started.
With that in mind, let's get underway!
Installation and Setup
Account Setup
Within the ![]() #altium
#altium ![]() @altium-admin
@altium-admin
But I don't have a Windows computer!
Never fear, many cool projects were designed without Windows computers! You have a few options:
- Install Windows in a dual-boot configuration with your current OS (only for x86 computers, you'll need a bit of storage)
- Run Windows in a local Virtual Machine (VM). VirtualBox works well on many systems, and Stanford offers VMWare for free, but for Apple Silicon (ARM) machines, only Parallels supports DirectX, without which things will be very slow.
- Connect to an SSI hosted Virtual Machine (VM). This works best when you're connected directly to a campus network.
- Use an SSI desktop, in ESIII. This works well, but can be inconvenient.
Installing Altium
Once you have an Altium account, Altium Designer can be downloaded here after logging in on the Altium website. Be aware that the software will only install on Windows operating systems. After downloading, install with the default settings.
Connecting Altium to the License System
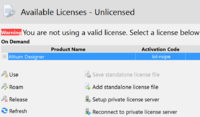
After Altium finishes installing, open it. Under "My Account," click "Sign in" and log in with your Altium account. Check "Sign me in when I open Altium Designer," as this will automatically grant you license access when you start the program. Next, under "Available Licenses," select Altium Designer from the list of products (you may or may not have other options listed; you can safely ignore all other ones) and click "Use" underneath (see right). This will now happen automatically every time you open the program.
Configuring Altium Preferences
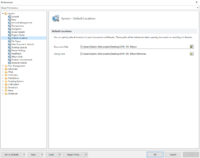
Altium's default preferences are quite workable, but a couple of settings relating to the default locations of files need to be configured on each new computer. To change Altium preferences, from the top bar, click "DXP → Preferences..."
Templates Location
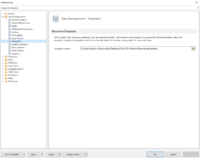
An unjustifiable length of time was spent creating formatting templates for SSI circuit schematics, which make for a clean, professional project and add a bit of information to each schematic. To use, in Preferences, go to "Data Management → Templates," and set the "Template location" field to point to the "libraries\templates" folder in your Altium SVN. See the image at right for an example of the result. TODO: Update the templates and these instructions.
Install the SSI PCB Logos Font
Adding logos to PCBs is an important aspect of professionalism, part of SSI's agreements with its sponsors, and a nice way to add some creativity to a technical process. For logos that SSI commonly uses, we've created a font with scalable versions of each. Download the font from the SVN, and install it to your computer.
Remap Delete Key
This step is only required of computers which do not have distinct "backspace" and "delete" keys. Desktops and most non-Apple laptops can skip this step. Apple laptops which have a "delete" key that functions as a backspace key may need to complete this step.
If you do not have a schematic open already, open one by clicking "File → New → Schematic." Next, open up the Customize panel by either clicking on a blank space of the toolbar (the space to the right of the "Help" drop-down menu works) or by right-clicking in that same spot and selecting "Customize..." In the window that comes up (see right), click "Edit" from the "Categories" column on the left, then double click on "Delete" in the "Commands" column on the right. This is the command used to delete components from a schematic, which is by default mapped to the delete key, which, if you're completing this step, you do not have. Click the "Primary" field, and then hit your backspace key to remap the command to that key. This only changes the delete key for schematics, so repeat this process with a PCB document open.
You're done! Welcome to Altium!
Next Steps
- A First Project
- This (currently in-development) guide offers you a walkthrough of a fun introductory Altium project, which ends with making a circuit board that allows you to play StrEEt Fighter with your fellow SSI members.
- Creating Parts for Altium Libraries
- This guide walks you through the process of adding new parts to the SSI Altium library, teaching both the process involved and quality standards for the library that we and the Stanford Solar Car Project have long worked to maintain.
Addendum: SVN
If you need a single file from the SSI SVN, you can download it from the web interface. If you want to download many files, or make changes, you will need to check out the SVN repo.

